Bandai HG 1/144 RX-78GP03 Gundam

Appeared in: Mobile Suit Gundam 0083: Stardust Memory

Estimated duration: 3 weeks

Bandai 1/60 PG MS-06 Zaku 2

Appeared in: One Year War

Estimated duration: 4 weeks

Bandai MG 1/100 Exia

Appeared in: Gundam OO

Estimated duration: 1 weeks

Super G 1/100 Resin Case NZ-666 Kshatriya

Appeared in: Gundam Unicorn

Estimated duration: 12 weeks

Bandai 1/100 MG MSN-04 Acguy

Appeared in: One Year War

Estimated duration: 2 weeks

Bandai 1/60 PG MSZ-006 Zeta Gundam

Appeared in: Z Gundam

Estimated duration: 24 weeks

Friday 16 November 2012

Project #6: MG MSN-04 Acguy

Objectives:

Understanding the effect of using 3 shades of paint.

Duration: Hopefully by 2 week.

The Box:


The Build Process:

No rocket science to this model kit. Very simple to build as compared to Exia.
Spent at least 1hour a day to trim, sand and prep each parts for painting.
Body internals are assembled first to ease painting.

The Painting:

The painting is slightly more troublesome as I do not have the colours readily to start with. So I did some mixing to get the colour I wanted. Here's what I have used:

Surfacer + black (50%)
Medium Brown (70%) + Black (30%) = Brownish colour
Dirty Yellow (70%) + Black (30%) = Light Khaki colour
Gun Metal
Chrome Silver
Neutral Grey
German Grey.
Flat Clear.

Started off with the surfacer then followed by the brownish shading. Thereafter, I added at least 10-15% of pure white to the brownish colour and finish off the part with the lighter colour. Thus completing the part with 3 colour tones. The results were satisfying!

Here are some pics to show off the shading:


It's 4am by the time I finished painting... I managed to completed its clear coat  on the next following day.

The Final Product:

After a good rest, continued with the panel lining and decal-ling. The end results.


It looked very cute instead of being awesome. It became an instant favorite piece for my wife!

Note: Decided not to use the clear parts and its base that came with it. Anyone interested?

Check out more photos here.

Thursday 2 August 2012

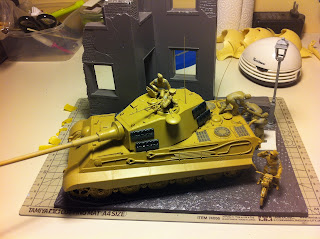
Project #5: Tamiya 1/35 German King Tiger Part 2

Objective:

To camouflage the tank

The Paints:
Dark Yellow
Dark Green
Brown
Black
Silver.

Painting:

Work from light colours to darker colors. After Surfacer, Dark Yellow was applied evenly on the entire model (should have done the gradation as I have for my Gundams...).

Then Dark Green was applied as the first part to camouflaging this Tiger. From the box, the Dark green patterns seems easy to follow but soon realised that the pattern doesn't quite "work" for the top part of the tank...So I decided to go with the flow and follow my preference in the end.

Brown + Black (1:1) for the brownish tone on the camouflage (As I am using Gaia paint this mix was close enough. If using Tamiya, red brown is the colour to use).

Black + Silver (1:0.5) for the tracks. Studied from the web, some don't bother to paint it and go straight for weathering. Not sure I did the right thing...

The dots are then applied using Tamiya Enamels.

Here are some of the pictures. King Tiger fresh from the factory:


It looks like I have overcome my first hurdle: Camouflaging.

Next:
Project #5: Tamiya 1/35 German King Tiger Part 3

Project #5: Tamiya 1/35 German King Tiger Part 1

The Project
Ok... this is out of the blog's theme..
What the hell! This has to be my favorite tank of all time.
Not building 1 is a sin!

The Box:


There are 2 versions to this kit. Another kit contains photo-etched parts and metal barrel!
As this is a practice kit, I decided not to invest too heavily in it thus bought the one without. And I regretted it. I bought the photo-etch grills later


and the cost already exceed the kit that comes with it...

Objectives:

No need to make this tank as close to history. Just need to learn the following:
1) Camouflage airbrushing
2) Weathering
3) Facial painting
4) Diorama

Duration:

2 months

Building:

A very straightforward process to build it as compared to some Master Grade Gundams. Just remember to use Tamiya's Thin Cement. Its a wonderful cement for small parts like On Vehicle Maintenance (OVM) and small fragile parts.

The kit comes with rubber tracks instead of a molded one.After building it, I felt that it should have used molded tracks instead...

Anyway, I managed to build the entire tank and its diorama set (will review this later in the blog) when I was building Kyshatria.

Next:
Project #5: Tamiya 1/35 German King Tiger Part 2

Monday 23 July 2012

Project #4: Part 5 - 1/100 Resin Cast NZ-666 Kshatriya

Objective:
To complete the model

Duration:
2 days

Highlights:

- Underestimated the waist joint which joins to the lower body. Did a quick fix (cutting off the upper part of the ball joint) to lower it but yet it is high enough to rotate.

- The quad wings are too heavy to be resting on the shoulders. Still pondering on a solution.Will update again when I find a solution...

Anyway, here are the pictures. Check out the Completed models for more pictures.


Thursday 19 July 2012

Project #4: Part 4 - 1/100 Resin Cast NZ-666 Kshatriya

Objective:
Assemble all the lower parts of the body

Duration:
1 day

The Build:

The amazing Epoxy Adhesive:


Do note that using Epoxy  Adhesive is my preferred way of joining the parts. It bonds so well and firm (just remember the working time. Some takes 5mins, 3 mins or etc. And full bonding takes an hour). Definitely stocking this up for my future builds.

While waiting for the bond to cure, masking tapes were used:


No rocket science when assembling the parts was test fitted before painting.

Here are some of the pictures after assembling:


Thoughts: It looks very much like the designer of this Gundam is inspired by beetles... very nice and awesome nonetheless!


Next Post:
Project #4: Part 5 - 1/100 Resin Case NZ-666 Kshatriya

Monday 16 July 2012

Project #4: Part 3 - 1/100 Resin Cast NZ-666 Kshatriya


Objective:
To paint the entire model.

Duration:
1 month

Update: Again... overrun... 1.5 month.

The Colours:

Gaia Notes Lacquer: Vivian green, Black, White, Gun Metal, Bright Silver, Sunshine Yellow and Dark Yellow

Tamiya Enamel: Titanium Silver, Gold Leaf, Dark Iron, Clear Red, Flat Black, Black, Copper and Red.

The Shading: 

As requested in some forums on how I actually shaded my models, I have put up a very simple how-to in this post.

Step 1: 
- Apply Surfacer.
- Apply a base colour.


Step 2:
- Get the actual colour for the model.
- Set the airbrush (preferably double action) such that you can spray a faint line and slowing pull back the trigger until you get a clear line without increasing/decreasing the distance between your airbrush and a piece of paper.


Step 3:
- Study the shape of your subject.
- Start spraying from the same distance as you did in Step 2 with the piece of paper but your trigger should be held at the faint line.
- When you spray, make sure to focus on the center of the surface only. If you do it correctly, the base colour will still show clearly at the edges.
- Increase the distance (roughly 0.5 times more) between your airbrush and the subject. Then spray while holding the trigger at the position that gives you the clear line in Step 2. This should provide a good mist on the subject and smooth out the edges with the actual colour.


Step 4:
- Confirm the shading is even. If not, go back to Step 3.
- Spray a clear coat on top to seal the shading. That's it.

After all the parts are sprayed. Be sure to soak your hands in warm water. Because... its really tiring. (probably I'm not doing it smartly. Any constructive comments on my steps are welcome)

(Do note that this is by no means a perfect how-to. Its just a way of how I understood from Japanese model making books and other websites. There are good how-to sites that explains the techniques in details like Pre-shading, Post-shading, gradation and etc.. Do a quick find in the net.)

The Painted parts:


Next Post:
Project #4: Part 4 - 1/100 Resin Case NZ-666 Kshatriya


Saturday 14 July 2012

Project #4: Part 2 - 1/100 Resin Cast NZ-666 Kshatriya

Objective:
To prep the entire model.

Duration:
1 month

Update: Took more than 2.5 months! Due to work commitment...

The Build:

Well... this is a recast and the packaging is not fantastic. Parts are broken before I even start building.

The Leg
To start off with this awesome Gundam, the legs were the obvious choice for me as I wanted it to stand on its on feet. No frills in assembling but removing the access parts were not easy. Take a look at the feet and see how much you can spot the additional work to rectify the "defects":


Next. To fix the legs to the feet. The ball joints needed some minor work with polyester putty to have a solid fit and the details needed some minor cutting to make it obvious and perfect for painting later on. The end result:


Somethings to take note when cutting off access from a resin:
1) Do not cut exactly on the actual body parts as it will crack or chip off unnecessary. Instead file it down where ever necessary.
2) Hold each parts against a strong lighting to reflect any bad molding before cutting as it will prevent more additional work.
3) Polyester Putty is a fantastic material to work with (except for its smell. Work in a well ventilated environment to ensure you do not faint in front of your model)
4) Read that resin is bad for health, so I used "wet sanding" (means using sandpaper and sand the part under running water or a basin) throughout the build.

The Head
Something interesting for this part...


Note: Realised that in the anime, the eye is red. Thus went to change the LED from Green to Red.

The Arms
This is the best part to work with. The open and clench hands looks fantastic. But it's visible seams need to be cut ensure all fingers are obvious for the open hands. For clench hands, each fingers needs to be shaped using the modelling knife to ensure all fingers are rounded. Tough but worth it:

The shoulder joints are horrible. 2 options:
1) To joint them then put putty
2) To sand it flatly and join them.
I choose option 2 to save time and the results were good.

The final results after sanding and fitting:


The Torso
This is the part that has the most polyester putty due to its bad molding.
Just take a look:


Note:
Masking and painting are very tough. Patience... but worth it.

The "Wings"
Awesome to look at at its shape, superb to stare at the details but fitting is a nightmare!
The access were so thick and hard, smoothing it out takes a lot of effort. (Using my Dremel is out of the question as it will produce so much resin dust!)

The small additional arms which are attached to the wings are pretty fragile. Few fingers broke during the process of fitting the parts together.


Thursday 17 May 2012

Project #4: Part 1 - 1/100 Resin Cast NZ-666 Kshatriya

The Project:

This project also marks the first gundam base on Gundam Unicorn serious.
This is an awesome looking Gundam (besides Devil Gundam) that prompted me to build a resin cast.

Note: JDG-009X Devil Gundam from the G-Gundam series will be rebuild and blog in the near future. Stay tune...

The Box:


Objective:
To refresh what its like to build a resin cast and to start my collection on Gundam Unicorn series.

Duration:
Scheduled to complete in 3 months.

Additional Materials and Tools used for this project:

1) Tamiya polyester putty
2) Tamiya Putty glue
3) Tamiya hand file
4) Gel-type CA.


Next Post:
Project #4: Part 2 - 1/100 Resin Case NZ-666 Kshatriya

Friday 6 April 2012

Project #3: Gundam Exia


Objectives:
Focus on mastering shading.

Duration: Hopefully by 1 week.

The Box:


The Build Process:

After so many years absence from making Master Grade, I find this Gundam rather difficult to build. One needs to follow the instruction carefully especially the torso. No modification was made except sharpening its antenna.

1 mistake made was to cut all the parts from its tree and not keeping them in the order it was from. Lost 1 finger in the process... made a finger out of pla-plate. Spot the finger?


The Painting:

Painting this model was great! Every parts are separated for its colour. So clipping a part and you are ready to paint. Colours are pretty straightforward. White, blue, red and yellow. Only difference is using surfacer mixed with black. The results on white shading is pretty awesome! There are substantial number of parts to spray. But comparing to Dendrobium, this is much easier. Here are some pics:


Just look at the number of parts! Truly a Master Grade! Completed shading all these parts till 3am in the morning! Definitely going to paint my next model in installments...

The Final Product:

After a good rest, continued with the panel lining and decal-ling. The end results.


Check out more photos here.

Sunday 25 March 2012

A visit to Japan...

The Trip:

After being caught up with work and commitments for 12 years.
I have decided to call it a break and prepared to spend a nice holiday with my family in Tokyo Disney!

During our stay in Japan, we visited Yodobashi Camera in Akihabara:

Take from Bayside Station -> Maihama Stationn -> Hatchobori Station -> Akihabara Station ->Exit 2.

Here's a picture walkthrough:


First junction turn left...


Take lift to level 6...


Go straight then turn right...


Then greeted by Nomoken's creation...


then shocked by so many Gundams available on shelves at almost half the price of what I would pay in my country!


Too bad I'm on a budget...
Nonetheless, I still managed to get what I wanted and a little more....

Look at how the pack my 00 Raiser... 


Conclusion

Love the orderly and well mannered city. Definitely going there again!