Objectives:
For the second part of the building chapters, I will continue on those parts that require gluing, sanding the seams or any minor modification.
Duration: Hopefully by 1 week.
The Weapons:
No frills here. Simple glue, join and sanding.
The missile pods fittings are bad. It does not flush. Pretty lots of sanding will be required.
I opt for the faster fix. Using my Dremel then sanding it with a 400 sandpaper did the job well.
The Main Cannon Assembly:
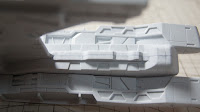
This is a very huge assembly!
After getting the seams out of the way, roughen the entire surface and redraw the panel lines, my arms were sore! The end results were satisfying. With such a nice huge part at hand, new ideas starts to pop up in my mind. I might just add LED into it... Stay tune..
Note: Notice that there is a gray area which is surrounded by all the white parts.Initial plan was to have the gray part painted first. But I decided to go with the plan of masking. Hopefully I will not regret this...
The Weapon Bay Assembly #1:
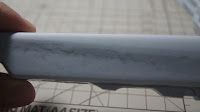
These bays are made of some smooth plastic material with a purpose.
To allow the weapons to slide in and out of it smoothly. So I am faced with a dilemma for these part.
To paint or not to paint.
In the end I have decided to paint only the exterior with Surfacer then Matt Black. With this decision, I will not be taking too much time building it or sanding it to shape. I will just remove the burrs and join the parts according to the instructions.
The Weapon Bay Assembly #2:
This part looks out of place for a weapon bay right? In actual fact, this is the most critical part for the weapon bay. Its the part that pops the weapons out from its docking bay. Each of these parts contains a spring strong enough to rotate its mid section. Thus giving its "popping" effect. I have also applied a good amount of grease to prevent spring seizure and rusting. It will also provide better "popping" effect (..I hope).
The Rest:
Managed to complete earlier than what I set out to do in my schedule. So I decided to focus on the rest of the parts and reduce the build time for Orchis.
Well... I must say... this is a very daunting task. Sanding every remaining parts and redrawing its panel lines are no joke. Some parts are huge. By the time I finished them I decided to take 1 week break to recuperate from the monotony syndrome these parts have given me...
Next Post:
Project #2: Part 2A - Completing Denbdrobium Stamen
For the second part of the building chapters, I will continue on those parts that require gluing, sanding the seams or any minor modification.
Duration: Hopefully by 1 week.
The Weapons:
No frills here. Simple glue, join and sanding.
The missile pods fittings are bad. It does not flush. Pretty lots of sanding will be required.
I opt for the faster fix. Using my Dremel then sanding it with a 400 sandpaper did the job well.
The Main Cannon Assembly:
This is a very huge assembly!
After getting the seams out of the way, roughen the entire surface and redraw the panel lines, my arms were sore! The end results were satisfying. With such a nice huge part at hand, new ideas starts to pop up in my mind. I might just add LED into it... Stay tune..
Note: Notice that there is a gray area which is surrounded by all the white parts.Initial plan was to have the gray part painted first. But I decided to go with the plan of masking. Hopefully I will not regret this...
The Weapon Bay Assembly #1:
These bays are made of some smooth plastic material with a purpose.
To allow the weapons to slide in and out of it smoothly. So I am faced with a dilemma for these part.
To paint or not to paint.
In the end I have decided to paint only the exterior with Surfacer then Matt Black. With this decision, I will not be taking too much time building it or sanding it to shape. I will just remove the burrs and join the parts according to the instructions.
The Weapon Bay Assembly #2:
|
|
This part looks out of place for a weapon bay right? In actual fact, this is the most critical part for the weapon bay. Its the part that pops the weapons out from its docking bay. Each of these parts contains a spring strong enough to rotate its mid section. Thus giving its "popping" effect. I have also applied a good amount of grease to prevent spring seizure and rusting. It will also provide better "popping" effect (..I hope).
The Rest:
|
|
|
Managed to complete earlier than what I set out to do in my schedule. So I decided to focus on the rest of the parts and reduce the build time for Orchis.
Well... I must say... this is a very daunting task. Sanding every remaining parts and redrawing its panel lines are no joke. Some parts are huge. By the time I finished them I decided to take 1 week break to recuperate from the monotony syndrome these parts have given me...
Next Post:


